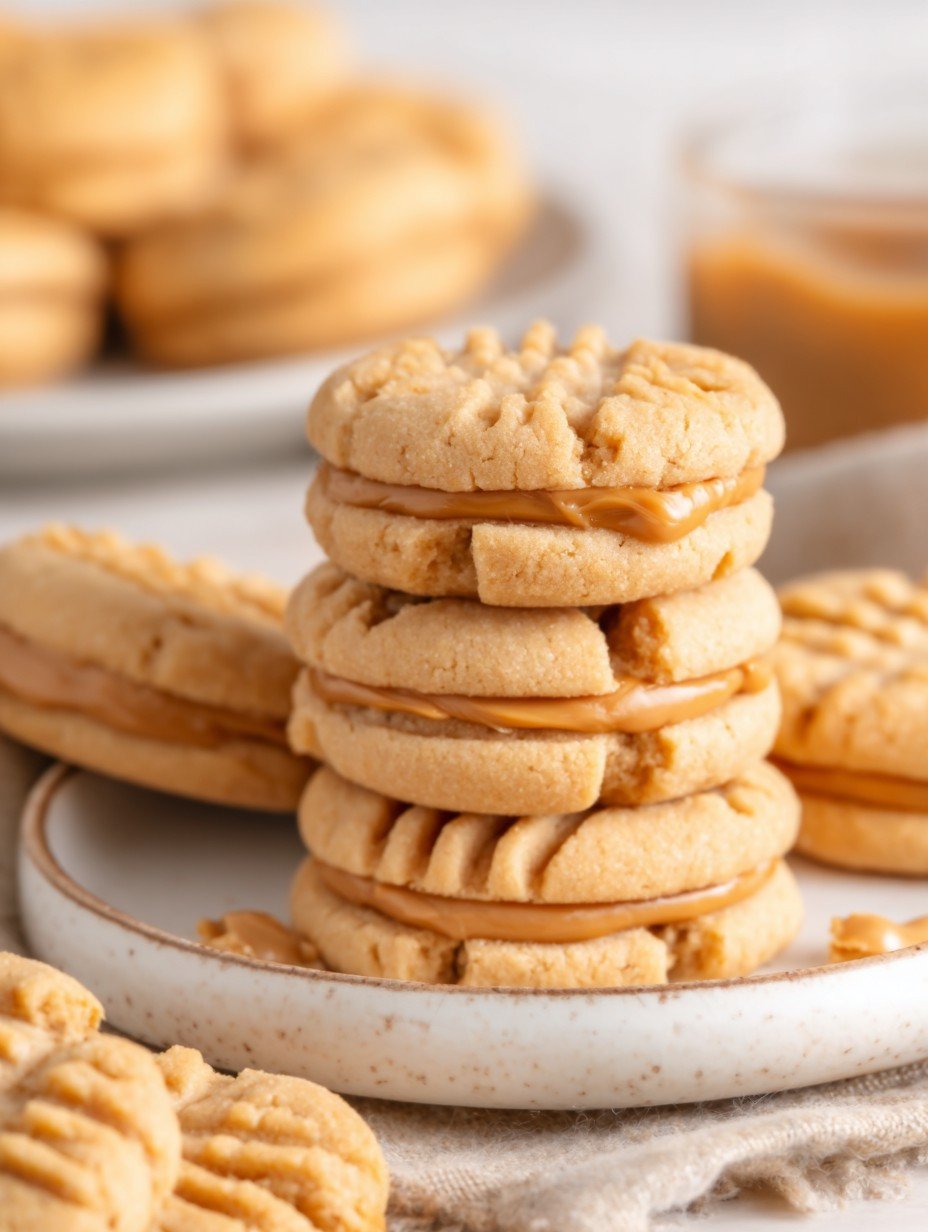
Imagine taking a bite of a tender, crumbly peanut butter cookie, its golden edges giving way to a rich, creamy filling that dances on your taste buds. The delightful contrast between the sweet and savory notes creates an irresistible treat that’s perfect for any occasion.
Growing up, my kitchen was always filled with the comforting aroma of baking cookies. I remember my grandma’s knack for whipping up batches of peanut butter delights that vanished faster than you could say “cookie monster.” Today, I’m excited to share how to make homemade Nutter Butter cookies that will evoke those sweet memories and are just as fun to make (and eat!).
Reasons Why You’ll Love This Recipe
This recipe is a breeze to prepare, making it perfect for both novice bakers and seasoned pros alike. The unique flavor profile combines the nutty richness of peanut butter with sweet undertones, creating a cookie that’s simply unforgettable. Visually stunning with their crisscross pattern, these cookies are sure to impress at any gathering. Plus, you can easily customize them by adding chocolate chips or sprinkles for an extra fun twist!
Ingredients
Here’s what you need for this delicious dish:
– **Unsalted Butter**: Use softened butter for easy mixing; it helps create that light and fluffy texture in the cookie dough.
– **Granulated Sugar**: This adds sweetness and contributes to the cookie’s delightful crunch.
– **Light Brown Sugar**: Packed brown sugar brings moisture and a hint of caramel flavor to the cookies.
– **Creamy Peanut Butter**: The star ingredient! Choose a good quality brand for the best flavor and texture in both the cookies and filling.
– **Large Eggs**: These act as a binding agent and help provide structure to the cookies.
– **Vanilla Extract**: A splash of vanilla enhances the overall flavor profile with warm undertones.
– **All-Purpose Flour**: Essential for structure; make sure it’s measured accurately for perfect results.
– **Baking Soda**: This leavening agent gives the cookies that lovely lift while baking.
– **Salt**: A pinch enhances all the flavors in your cookies without making them taste salty.
For the Peanut Butter Filling:
– **Unsalted Butter**: Again, soften it before mixing; this ensures smooth incorporation into your filling.
– **Creamy Peanut Butter**: Yes, we’re doubling down on peanut butter goodness here!
– **Powdered Sugar**: This gives your filling its sweetness and smooth texture—no gritty frosting allowed!
– **Milk or Cream**: Just enough liquid helps create a spreadable consistency; add more if necessary.
– **Vanilla Extract**: Because who doesn’t love an extra layer of flavor?
– **Salt**: Balances out sweetness in your filling.
Step-by-Step Instructions
Here’s a simple guide to help you prepare this delicious recipe:
Step 1: Prepare the Cookie Dough
In a large bowl, cream together the softened unsalted butter, granulated sugar, and light brown sugar until light and fluffy. Beat in the creamy peanut butter until well combined. Add each large egg one at a time, mixing well after each addition. Finally, stir in the vanilla extract.
Step 2: Combine Dry Ingredients
In a separate medium bowl, whisk together the all-purpose flour, baking soda, and salt. Gradually add this dry mixture to your wet ingredients while mixing on low speed until just combined. Avoid overmixing; we’re aiming for soft dough!
Step 3: Chill the Dough
Cover your dough with plastic wrap or a clean towel and chill in the refrigerator for at least 30 minutes (or up to an hour) to make it easier to handle later.
Step 4: Preheat Oven and Shape Cookies
While waiting for your dough to chill, preheat your oven to 350°F (175°C). Line your baking sheets with parchment paper like you mean business! Roll chilled dough into 1-inch balls and place them about 2 inches apart.
Step 5: Create Pattern and Bake
Using a fork, gently press down on each cookie ball creating that iconic crisscross pattern. Bake for 10–12 minutes or until edges are lightly golden while centers remain just set—trust me; they still have some soft magic going on!
Step 6: Cool Cookies
Let those heavenly cookies cool on their baking sheets for about 5 minutes before transferring them to wire racks where they can cool completely without interruption.
Step 7: Make the Filling
While those beauties cool down, prepare your filling! In a medium bowl, beat together softened unsalted butter and creamy peanut butter until perfectly smooth. Gradually mix in powdered sugar until combined. Add 2 tablespoons of milk or cream along with vanilla extract and salt, beating until light and fluffy. If needed, add more milk or cream by teaspoonfuls until it reaches that divine spreadable consistency.
Step 8: Assemble Sandwich Cookies
Once cooled completely (patience pays off!), spread a generous amount of peanut butter filling onto one flat side of each cookie. Top with another cookie flat side down—press gently so they form adorable little sandwiches. Repeat until all cookies are transformed into scrumptious delights!
Now that you’ve mastered how to make homemade Nutter Butter cookies from scratch, serve them proudly! Store assembled cookies in an airtight container at room temperature for up to three days—if they last that long! Enjoy reliving those nostalgic moments with every delightful bite!
Perfecting the Cooking Process
To achieve cookie perfection, remember to chill the dough for at least 30 minutes. This step prevents the cookies from spreading too much in the oven and helps maintain their delightful shape. Plus, it’s a great excuse to nibble on some extra peanut butter.
Add Your Personal Touch
Feel free to switch things up by using crunchy peanut butter instead of creamy for a fun texture twist! You can also add a sprinkle of sea salt on top for an extra flavor kick that pairs beautifully with that sweet filling.
Storage & Reheating
To keep your homemade sandwich cookies fresh, store them in an airtight container at room temperature for up to 3-4 days. This helps maintain their delightful texture, so avoid refrigerating them unless you want a chewy surprise!
Helpful Chef Tips
One unforgettable moment was sharing these cookies with friends during a backyard barbecue. Their delighted reactions made all the baking effort totally worth it!
Final Thoughts
Indulging in homemade peanut butter sandwich cookies is a treat for both the palate and the senses. With their tender, crumbly texture and rich frosting, these cookies perfectly blend sweet and savory flavors. Not only are they delightful to eat, but they also make for a fantastic addition to any gathering or a cozy night in. So, gather your ingredients and bring this recipe to life. You’ll create delicious memories with every bite of these classic cookies. Don’t wait—try making your own delightful version today!
PrintHow to Make Homemade Nutter Butter Cookies | Recipe
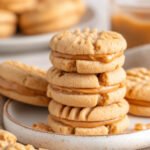
These homemade peanut butter sandwich cookies offer a delightful combination of textures and flavors. Each cookie features a tender, crumbly peanut butter biscuit, baked to a golden hue, with the characteristic fork-tine pattern. They are generously filled with a rich, creamy peanut butter frosting, creating a harmonious balance of sweet and savory notes. The baking process yields a comforting aroma and a satisfying bite, perfect for a classic treat.
- Prep Time: 25 minutes
- Cook Time: 12 minutes
- Total Time: 37 minutes
- Yield: 24 sandwich cookies 1x
Ingredients
- *For the Cookies:*
- 1 cup (2 sticks) unsalted butter, softened
- 1 cup granulated sugar
- 1 cup packed light brown sugar
- 1 cup creamy peanut butter
- 2 large eggs
- 1 teaspoon vanilla extract
- 2 ½ cups all-purpose flour
- 1 teaspoon baking soda
- ½ teaspoon salt
- *For the Peanut Butter Filling:*
- ½ cup (1 stick) unsalted butter, softened
- 1 cup creamy peanut butter
- 3 cups powdered sugar
- 2–3 tablespoons milk or cream
- 1 teaspoon vanilla extract
- ¼ teaspoon salt
Instructions
- Prepare the Cookie Dough: In a large bowl, cream together the softened butter, granulated sugar, and brown sugar until light and fluffy. Beat in the creamy peanut butter until well combined. Add the eggs one at a time, mixing well after each addition, then stir in the vanilla extract.
- Combine Dry Ingredients: In a separate medium bowl, whisk together the all-purpose flour, baking soda, and salt. Gradually add the dry ingredients to the wet ingredients, mixing on low speed until just combined and a soft dough forms. Do not overmix.
- Chill the Dough: Cover the dough and chill in the refrigerator for at least 30 minutes, or up to 1 hour, to make it easier to handle.
- Preheat Oven and Shape Cookies: Preheat your oven to 350°F (175°C). Line baking sheets with parchment paper. Roll the chilled dough into 1-inch balls. Place them about 2 inches apart on the prepared baking sheets.
- Create Pattern and Bake: Using a fork, gently press down on each cookie ball in a crisscross pattern. Bake for 10-12 minutes, or until the edges are lightly golden and the centers are just set. The cookies will still be soft when removed from the oven.
- Cool Cookies: Let the cookies cool on the baking sheets for 5 minutes before transferring them to a wire rack to cool completely.
- Make the Filling: While the cookies cool, prepare the filling. In a medium bowl, beat the softened butter and creamy peanut butter until smooth. Gradually add the powdered sugar, beating until combined. Add 2 tablespoons of milk or cream, vanilla extract, and salt, beating until light and fluffy. Add more milk or cream, a teaspoon at a time, if needed, to reach a spreadable consistency.
- Assemble Sandwich Cookies: Once the cookies are completely cool, spread a generous amount of peanut butter filling onto the flat side of one cookie. Top with another cookie, pressing gently to create a sandwich. Repeat with the remaining cookies and filling.
Notes
For best results, use a good quality creamy peanut butter for both the cookies and the filling. Avoid natural peanut butter that separates, as it can affect the texture.
Do not overbake the cookies; they will firm up as they cool.
Ensure cookies are completely cool before adding the filling to prevent melting.
Store assembled cookies in an airtight container at room temperature for up to 3-4 days.
Nutrition
- Calories: 280
- Fat: 16g
- Carbohydrates: 30g
- Protein: 6g
FAQs

How long should I chill the cookie dough?
Chilling the cookie dough is essential for achieving the right texture. It’s recommended to chill it in the refrigerator for at least 30 minutes, but you can extend it up to 1 hour if needed. This helps make the dough easier to handle and results in perfectly shaped cookies.
What type of peanut butter should I use?
For the best results, use a good quality creamy peanut butter for both the cookies and the filling. Avoid natural peanut butter that separates, as it can affect the texture of your cookies and filling, making them less enjoyable.
How do I know when my cookies are done baking?
Your cookies will be ready when the edges are lightly golden and the centers are just set. They may still look soft when you remove them from the oven, but don’t worry—they will firm up as they cool on the baking sheets.
How should I store my assembled sandwich cookies?
To keep your delicious homemade peanut butter sandwich cookies fresh, store them in an airtight container at room temperature. They should remain tasty for up to 3-4 days, allowing you to enjoy them over several days!