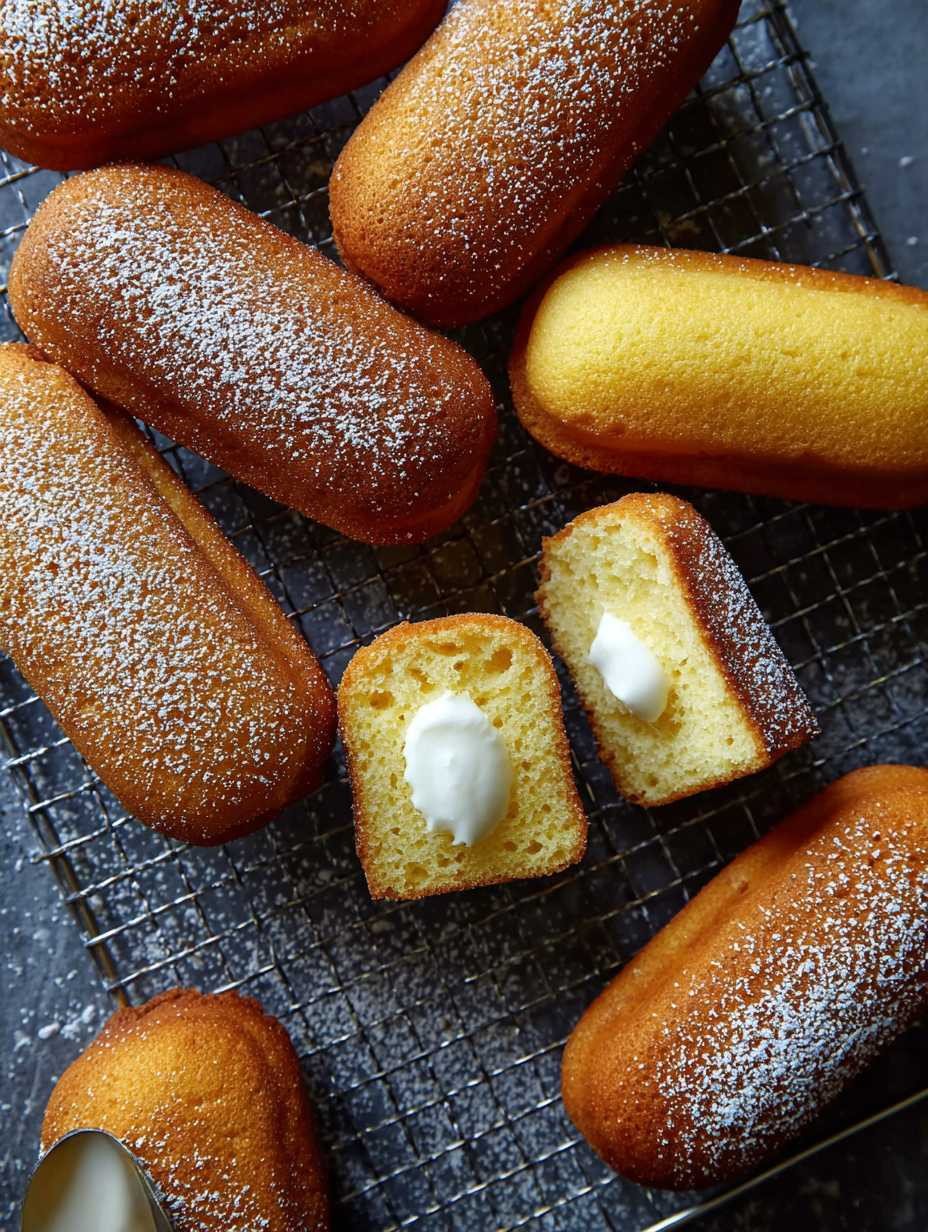
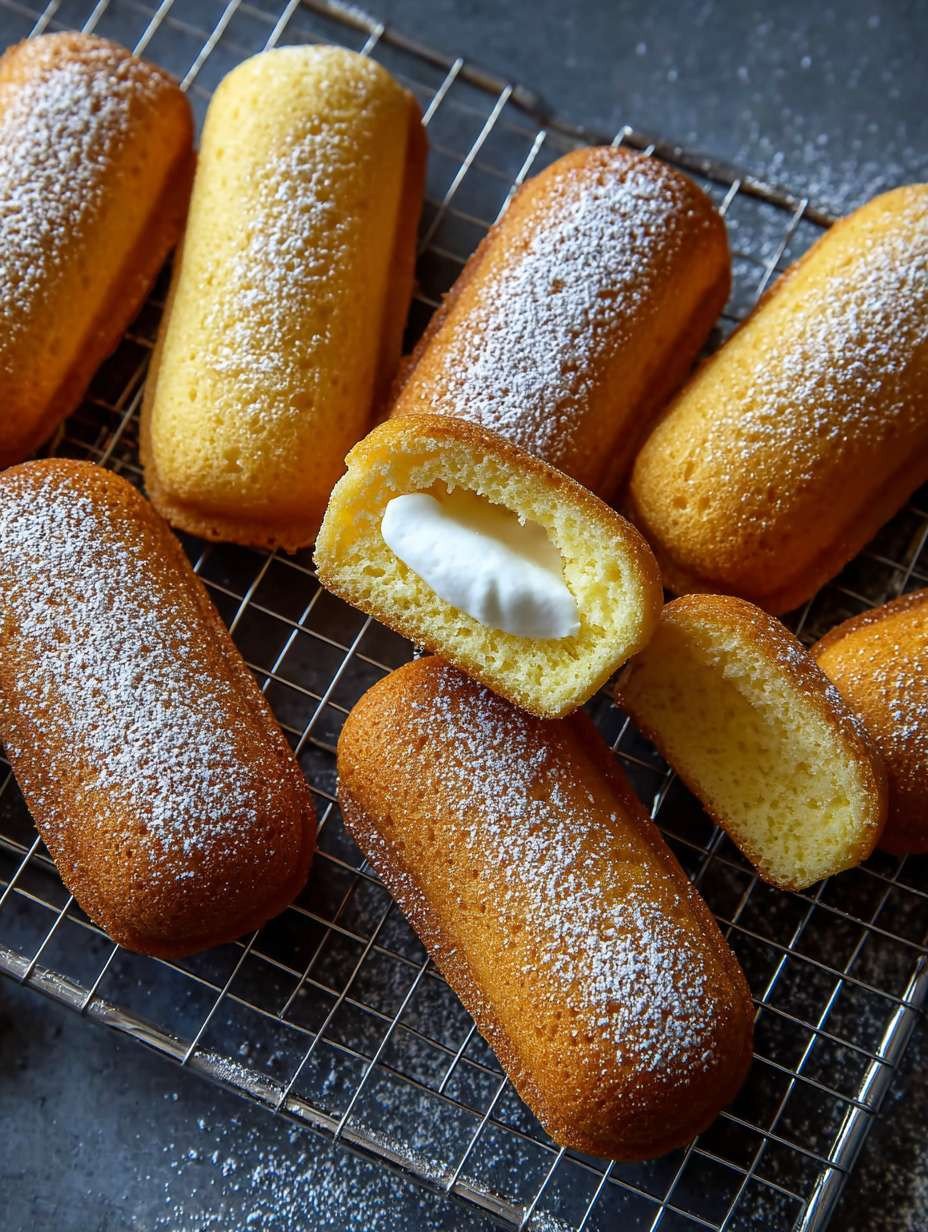
Imagine sinking your teeth into a soft, golden sponge cake, with a sweet, creamy filling that dances on your taste buds. Each bite is a delightful contrast of textures and flavors, making you wonder why you ever settled for store-bought treats.
Growing up, my snack time was often spent sneaking Twinkies from the pantry, hoping the crinkly packaging would keep my mom from noticing. Little did I know that one day I’d be crafting my own version at home, complete with a sense of pride and an adorable little apron that screams “I’m a pro,” even though I’m just winging it!
You’ll absolutely adore this recipe for several reasons. First off, it’s incredibly easy to whip up—no culinary degree required! The unique flavor profile combines rich vanilla with a light sponge that melts in your mouth. Plus, they look stunning on any dessert table, ready to impress friends and family alike. Want to play around? These cakes are versatile enough to allow for your own creative twists.
Here’s what you need for this delicious dish:
Let’s get down to business with this straightforward guide to creating homemade Twinkies that are truly better than the original!
Step 1: Preheat and Prepare
Preheat your oven to 350°F (175°C). Grease and flour a 12-cavity Twinkie pan or similar oblong cake molds—this is where magic happens!
Step 2: Whisk Away
In a medium bowl, whisk together 1 1/2 cups of all-purpose flour, 1 1/2 teaspoons of baking powder, and 1/4 teaspoon of salt until well combined. Set this aside like it’s waiting for its big moment.
Step 3: Cream Time
In a large bowl, cream together 1/2 cup of softened unsalted butter and 1 cup of granulated sugar using an electric mixer until it’s light and fluffy—about 3-4 minutes should do it. You want it airy like your hopes when you first saw those fluffy clouds outside.
Step 4: Eggcellent Addition
Beat in two large eggs one at a time, ensuring each is fully incorporated before welcoming its sibling into the mix. Stir in 1 teaspoon of vanilla extract because life needs flavor!
Step 5: Dry Meets Wet
Gradually add your dry mixture from Step 2 to the wet mix, alternating with 1/2 cup of milk. Start and end with dry ingredients (it’s like bookending your favorite story). Mix until just combined—overmixing here is like showing up at a party too early; nobody likes it.
Step 6: Fill ‘Er Up
Spoon the batter evenly into your prepared molds, filling each about two-thirds full because they’re going to puff up as they bake! Bake for 15-20 minutes or until a wooden skewer inserted comes out clean—golden brown glory awaits!
Step 7: Cooling Off
Once baked, remove those beauties from the oven and let them cool in their pan for about five minutes before flipping them onto a wire rack to cool completely. Patience is key; don’t rush this step!
Step 8: Fill ‘Em Up!
In another large bowl, beat together another half cup of softened unsalted butter until creamy. Gradually add in three cups of sifted powdered sugar while mixing on low speed until just combined; then crank up the speed to medium until it turns smooth.
Step 9: Creamy Dreamy Filling
Add in your choice of milk or heavy cream alongside another teaspoon of vanilla extract and another pinch (1/4 teaspoon) of salt. Beat this mixture on medium-high speed for about two to three minutes until it becomes light and fluffy.
Step 10: The Filling Process
Once those cakes have cooled completely (we don’t want any melty mishaps), use either a small round piping tip or skewer to poke three holes into each cake’s bottom. Transfer that dreamy filling into a piping bag fitted with said small round tip.
Step 11: Fill ‘Er Up Again!
Insert the tip into each hole gently squeeze until filled—you’ll feel resistance when they’re good-to-go! Arrange those filled cakes on a serving platter or wire rack because presentation matters.
Step 12: The Final Touch
Lightly dust the tops with additional powdered sugar just before serving—now they look as good as they taste!
These delectable homemade sponge cakes yield twelve delightful treats at approximately **320 calories**, **4g protein**, **55g carbs**, and **11g fat** each—a guilt-free indulgence that’s perfect for sharing (or not!). Store any leftovers in an airtight container at room temperature or refrigerate them; they’ll last up to three days at room temp or one week chilled.
Now grab your apron and get baking! Your friends will thank you—or maybe they’ll just beg you never to stop making these delicious gems!
Perfecting the Cooking Process
To achieve perfect homemade Twinkies, remember to preheat your oven before mixing ingredients. Greasing and flouring the molds is crucial to ensure easy removal. Also, let the cakes cool completely before filling them; this keeps the creamy goodness from melting away!
Add Your Personal Touch
Feel free to get creative with your vanilla extract! You could try using almond extract for a nutty twist or even a splash of lemon extract for a zesty kick. Both will add a unique flavor profile to your delightful cakes!
Storage & Reheating
To keep your homemade Twinkies fresh and fluffy, store them in an airtight container at room temperature for up to three days. If you want to prolong their life, refrigerate them for up to a week—just make sure they’re fully cooled before sealing!
Helpful Chef Tips
I once made these delightful treats for a friend’s birthday party, and they were gone in minutes! Who knew nostalgia could taste so sweet?
Final Thoughts
Indulging in these homemade sponge cakes brings a delightful twist to a classic treat. With their tender, moist crumb and rich creamy filling, they offer a perfect balance of textures and flavors, all while being surprisingly easy to make. The light dusting of powdered sugar enhances the sweetness, making each bite irresistible. So why not roll up your sleeves and recreate this nostalgic favorite in your own kitchen? You’ll not only impress family and friends but also enjoy the satisfaction of crafting something truly special. Give this recipe a try and experience the joy of making delicious homemade delights!
PrintHomemade Twinkies: Better Than the Original!
These homemade sponge cakes feature a delicate, golden exterior and a tender, moist crumb. Each oblong cake is generously filled with a sweet, creamy vanilla filling, offering a delightful contrast in texture and flavor. A light dusting of powdered sugar adds a final touch of sweetness to this classic treat, baked to perfection.
- Prep Time: 40 minutes
- Cook Time: 18 minutes
- Total Time: 58 minutes
- Yield: 12 cakes 1x
Ingredients
- For the Cakes:
- 1 1/2 cups all-purpose flour
- 1 1/2 teaspoons baking powder
- 1/4 teaspoon salt
- 1/2 cup unsalted butter, softened
- 1 cup granulated sugar
- 2 large eggs
- 1 teaspoon vanilla extract
- 1/2 cup milk
- For the Creamy Filling:
- 1/2 cup unsalted butter, softened
- 3 cups powdered sugar, sifted
- 1/4 cup milk or heavy cream
- 1 teaspoon vanilla extract
- 1/4 teaspoon salt
- For Dusting:
- Powdered sugar
Instructions
- Prepare the Cakes:
- Preheat your oven to 350°F (175°C). Grease and flour a 12-cavity Twinkie pan or similar oblong cake molds.
- In a medium bowl, whisk together the flour, baking powder, and salt. Set aside.
- In a large bowl, cream together the softened butter and granulated sugar with an electric mixer until light and fluffy, about 3-4 minutes.
- Beat in the eggs one at a time, ensuring each is fully incorporated before adding the next. Stir in the vanilla extract.
- Gradually add the dry ingredients to the wet ingredients, alternating with the milk, beginning and ending with the dry ingredients. Mix until just combined, being careful not to overmix.
- Spoon the batter evenly into the prepared molds, filling each about two-thirds full.
- Bake for 15-20 minutes, or until a wooden skewer inserted into the center of a cake comes out clean and the cakes are golden brown.
- Remove the cakes from the oven and let them cool in the pan for 5 minutes before inverting them onto a wire rack to cool completely.
- Prepare the Creamy Filling:
- In a large bowl, beat the softened butter with an electric mixer until creamy.
- Gradually add the sifted powdered sugar, beating on low speed until combined, then increase speed to medium and beat until smooth.
- Add the milk or cream, vanilla extract, and salt. Beat on medium-high speed for 2-3 minutes until the filling is light and fluffy.
- Assemble the Twinkies:
- Once the cakes are completely cool, use a small round piping tip or a skewer to poke three holes into the bottom of each cake.
- Transfer the creamy filling to a piping bag fitted with a small round tip.
- Insert the tip into each hole and gently squeeze to fill the cakes until you feel resistance or see a slight bulge.
- Arrange the filled cakes on a serving platter or wire rack.
- Lightly dust the tops of the homemade Twinkies with additional powdered sugar before serving.
Notes
Ensure all cold ingredients, especially butter and eggs, are at room temperature for a smoother batter and filling.
Do not overmix the cake batter; overmixing can lead to a tough cake.
If you do not have a Twinkie pan, you can use a mini loaf pan or even muffin tins, adjusting baking time as needed.
Cool the cakes completely before filling to prevent the filling from melting.
Store homemade Twinkies in an airtight container at room temperature for up to 3 days, or in the refrigerator for up to a week.
Nutrition
- Calories: 320 kcal
- Fat: 11g
- Carbohydrates: 55g
- Protein: 4g
FAQs
How do I ensure my cakes come out fluffy?
To achieve fluffy cakes, it’s crucial to cream the softened butter and sugar until light and fluffy, about 3-4 minutes. Additionally, make sure not to overmix the batter when combining wet and dry ingredients; mix just until combined for the best texture.
Can I use a different pan if I don’t have a Twinkie pan?
Yes! If you don’t have a Twinkie pan, you can use a mini loaf pan or even muffin tins. Just remember to adjust the baking time as needed since different pans may require varying cooking durations.
How should I store my homemade Twinkies?
Store your homemade Twinkies in an airtight container at room temperature for up to 3 days. For longer freshness, keep them in the refrigerator for up to a week. This will help maintain their moisture and flavor.
What should I do if my filling is too runny?
If your creamy filling turns out too runny, consider adding more sifted powdered sugar gradually until you achieve your desired consistency. Ensure that all ingredients are at room temperature before mixing for the best results in texture.